How to operate folder gluer machine
This manual describes method to operate folder gluer machine including its principle, structure, feature, specification, installation and transportation, operating method and safety precaution of this machine. You must read this manual before you use it, in order to install and operate correctly.
Safety Precautions
This machine should be installed, operated, repaired by professional staff. Before installing, operated, maintaining, inspecting, you must read this manual and attached files so that you can operate it correct.
No violation operation. You can install, operate, inspect. Maintain this machine after you fully aware of the condition of the machine, safety precaution and notice.
There are two safety precautions of the sign in this manual, one is “DANGER”, and the other one is “NOTICE”. Wrong operation to this machine, it may lead to death or serious injury. Wrong operation to this machine, it may lead to moderate injury or minor injury, equipment failure and damage.
In addition, recorded on the notice, as the situation is different, it may lead to serious consequences.
Please be sure to strictly comply the safety precautions in this manual.
Installation
DANGER
- Below the equipment hoisting and no standing, be careful with the collision and crushing.
- Must be connected by a professional electrician.
- Please confirm the power is off when you are connecting, in order to avoid getting a electric shock!
- Please make sure to connect the ground wire, in order to avoid getting a electric shock or catching fire!
NOTICE
- Should be choosing the place of easy operation, good ventilation and enough light. The distance of the machine and space around is not less than 1000mm, for the maintenance and repair.
- Should be installing on the smooth surface and able to bear the weight of the machine and the moderate vibration. Must be padded with rubber plate under the base and ensure the body of the machine ground connection.
- Must be do aligning lever when install.
- Do Wire connection after the body of machine is installing and adjusting.
- Must be equipped with protective equipment of protection when in and out of the cable.
- Please confirm the rated supply voltage and the request of the equipment is same when do wire connection.
- Please use the built-for-purpose tools to install and connect.
- Please stop install if the machine or the electric part is broken and contact with us timely.
Operation
DANGER
- The machine should be operated by the special personnel who have been trained!
- Please lock the door of the control central before delivery of electronic, do not open the door in the galvanization!
- Do not use the wet hand to control all the electric switches, button, in case of in case of getting the electric shock!
- Do not mix the hard material such as mental with electric and belt, in case of danger!
- Must be cut off power when you handle the fault or clean the equipment! if in electricity situation, it must be inspected by special personnel!
NOTICE
- Please keep the stable temperature and relative humidity when the machine is running in the machine room.
- Do not open the part’ shroud of the machine when in the state of runtime.
- Must run for 5~10 minutes in low speed before debugging in order to check whether there is any unusual point.
- Do not open the door of the running part of the machine in case of accident.
- Please press the emergency stop button to check the machine if runtime exception of the machine.
Maintenance, Inspection, Unit replacement
DANGER
- Must cut off the power before you check and maintain the machine!
- Must be equipped with protective equipment of protection when the special personnel inspect the machine in electricity condition!
NOTICE
- Non-designated person is not be allowed to maintain、inspect the machine。
- If the equipment idling, please start the machine once more than 1 hour, every thirty days.
- All of the lubricating point and shafts should be cleaned after use it every 6~8 months and oil renewing.
- Should clean the dust of the internal part of the machine timely, and check all the screws, fastening pieces whether it have started or moved, if have, please fasten.
- All the screws require periodic check and fastening.
- Every running parts and lubricated parts require periodic check.
Do not remodel the critical components of the machine. In case of danger or degradation of performance!
Products introduction
ZH series high-speed folder gluer machine is designed and manufactured by our factory based on absorbing the advantages of domestic and foreign folder gluer machines. It’s suitable for various paper boxes paste and automatic forming, with the features of reasonable structure, strong suitability, convenient operation and quick speed etc. It is an ideal folder gluer in post-printing.
The main spare parts of this machine adopt the import and domestic famous products, such as the folding belt is selected the imported strong adhesive rubber flat belt. It can prolong the service life of the whole machine and is 10-20 times than the common belts. The adjuster adopts the good frequency converter. Its power is large and the performance is stable and not easy to be damaged. The electric motor adopts the domestic famous motors. So the stability and reliability of this machine get high promotion.
Characteristics of the products
The whole machine is reasonable on design, low rate on breakdown and saving on electricity.
The speed adjustment can be finished for once and the front, middle and behind drives of the equipment are synchronic totally, so it’s very convenient to operate.
The electric control is advanced and the front and behind of the equipment all can control the running of paper feeding part. When the paper feeding part feeds paper, it begins to count with photoelectric technology. It also can set up a certain batches to feed paper and freely control the interval time between two batches. So it’s very simple to operate.
Quick speed and the middle grade paper box can produce 8000~25000 boxes hourly.
Main technical index
- usage paper: 180~650g/m2; paperboard, E corrugated
- the box forming: either side folds, the cash lock bottom folds, the both sides pre-fold and either side glue, the multi-functions either side folds (optional)
- electric: AC220V, 1P;
- weight: 1100Kg
- dimension: 6400*1000*1400mm
- max line speed: 300m/min
The basic components of the machine
Summary of debugging
ZH series high-speed automatic folder gluer machine is redesigned and manufactured by our factory based on absorbing the advantages from BOBST folder gluer machine and various imported folder gluer machines. The feature of the improved machine has simple compact, complete, flexible and convenient functions.
This machine possesses the functions of automatically paper feeding, automatically gluing, automatically folding and forming, automatically counting etc. and it’s really a full-automatic folder gluer machine. It also has the advantages of quick speed, simple operation, electric saving and paste saving etc.
It is mainly suitable for inside packing box paste and forming of various paper boxes, such as the tobacco box, medicinal box, make-up box, electric box and stationery box etc. and is ideal equipment for resolving the defects of over-paste, degumming or uneven pressure of the traditional handcraft paste box.
Operating principle and debugging method
Paper feeding part
The test of the paper feeding part (see picture 1) is a base of folder gluer, which can play important composition to whole folder gluer procedure. So please pay close attention to it while testing. The paper feeding part consists of five paper feeding belts, roll axle, two paper withstanding knives, two stainless steel back plates and one photoelectric counting sensor etc.
The tightness of the belt can be adjusted through two ends tight screw under the front roll axle. There are two methods to move the belt: First method is to loosen the adjustable screw on both ends tensile bearing and then loosen the plate tight screw of the shift groove wheel, thus the belt can be moved freely;
The second method is to use the rotary method to move the belt in hand or dynamic. When moving, you can close the front main machine (close with the triplex coupling air switch in electric distributor, close the frequency converter while opening). But please pay attention to safety, this method is suitable for small amplitude moving.
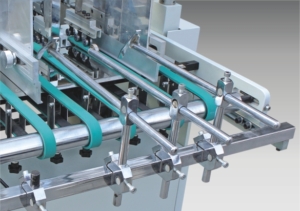
The position of the two paper baffle knife row has four requirements: First, withstand the hard face of the belt (the position of roll axle under the belt); Second, the better the near of the fold line is. Do not deviate the position of the behind fold belt, otherwise, the paper sheet is easy to slope; Third, withstand the most front end of paper sheet.
The most front end is easy to touch the belt; Fourth, the front and behind lengths of paper withstood part should be the same, otherwise, it will cause the paper slope due to friction unparallel. The low end of the paper baffle knife row and the interval of the belt are standard based on a thickness of a piece of paper.
The dynamic power of driving the paper sheet is the friction power between the belt and the lowest layer, so the touch face of the paper box and belt is very important. Add more belts possibly under the paper sheet. The tail part can be raised highly for large box and can be dropped down for small box. The paper feeding part also equips with a vibrator. Users can select whether you need the vibrator or not. There are two photoelectric tubes on the sensor, which can be aligned with the side of the paste port.
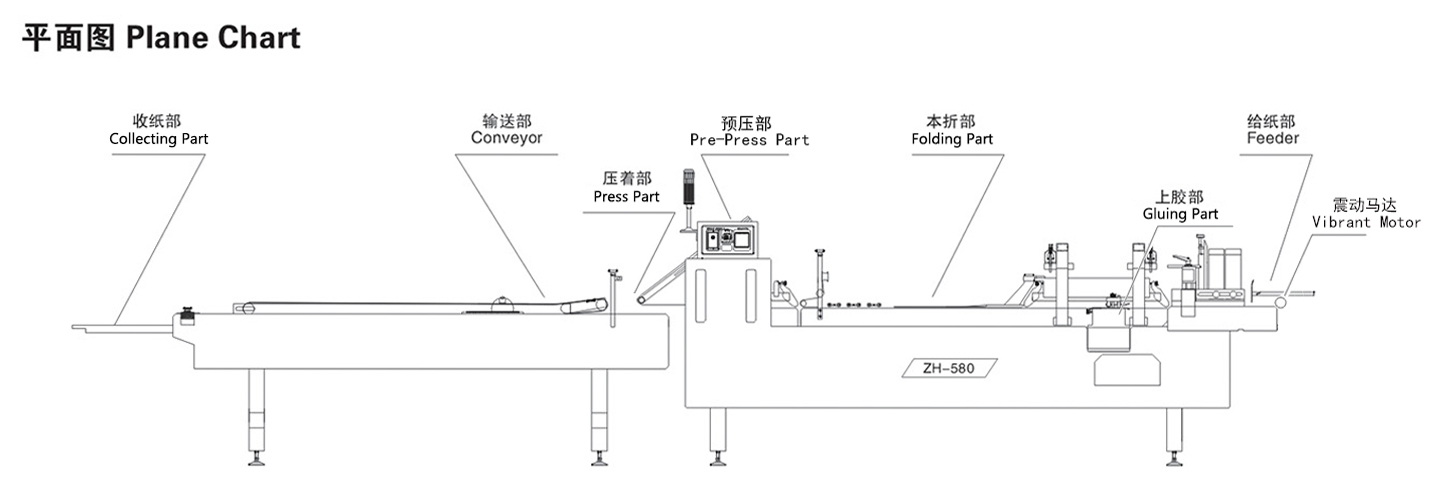
Pasting part
The paper feeding part is connected sheet by sheet continuously while feeding paper. Paper feeds from the paper feeding part to the pasting part (see picture 2). Before going to the pasting part, first adjust the right and left moving rows well. Please refer to the folding part how to adjust it. The speeds of the belt of pasting part and paper feeding part are different.
The pasting part is fast but the paper feeding part is slow. When the paper sheet enters the pasting part, the side, which first enters the pasting part, will first get the tensile composition, so as to let the paper sheet slope, so please adjust well the front and behind moves of two rows small wheels on the belt of pasting part, so that two sides can enter the paper sheet at the same time and can’t be slopped.
After adjusting the box correctly, finally shake the glue wheel to the proper position of the paste port. Press the front press wheel and let the glue completely adhere the paste port and balance with the box edge. Adjust the glue quantity with the small hand wheel beside the glue box.
Fold part
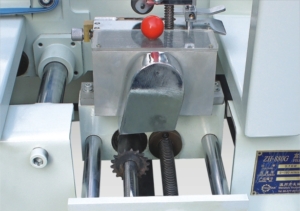
The paper box will enter the fold part after pasting. The fold part mainly consists of four parts. (See picture 3)
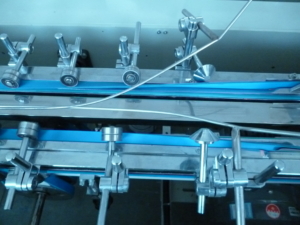

The tightness of upper and lower, right and left of the fold belt should be identical. Two upper adjustable handles use to adjust the two upper belts and two lower adjustable handles use to adjust the two lower belts. (adjust separately)
Two removal rows can be adjusted with the hand wheel according to the dimension of the paper box. The width of adjusting two belts is wider 1-2 mm of the trace of the folded paper box edge.
Two widths of folded knife row should be less 1-2 mm of the paper box folded trace. The height between the fold knife and belt should be wider of the thickness of a paper sheet. The fold knife row in upper and lower, right and left has adjusting part to be fixed on the moving row, so it’s unnecessary to adjust the knife row to the paper box with little different thickness.
The back wheel outside the belt and natural curve of the fold belt should be coincided. Do not lean against too tight. Do not bend too strong while the paper box walks to the bend part. Adjust the belt with the back wheel into the natural curve bend per the press trace line of the paper box. After the paper box wholly enters the fold tape, the behind two press wheels will press the two sides of the paper box tightly and to be formed and then enters the press part.
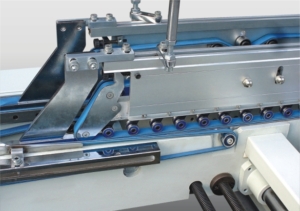
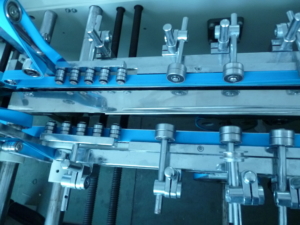
The fold part also equips with two stainless steel wires, which mainly point to the flat box. The flat box is disassembled one side first, so it’s difficult to reach the requirement with belt, this time, you can use the stainless steel wires to help. (see picture 4)
The fold part also equips with a groove flat wheel, which mainly points to the flat box and lets the other side of the flat box enter first. (see picture 5)
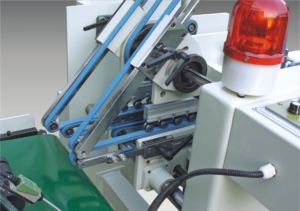
Press part
The press part consists of four large wheels and one stroke protective switch (see picture 6). Four wheels mainly charge the pasted box not to rebound and fold the paper box to be sent to behind convey part.
The stroke switch mainly protects the paper box not to be damaged. If some individual paper boxes have problems and cause jam, the jammed paper boxes impact the stroke switch and the equipment will stop running immediately, which will not let the behind normal paper boxes cause waste.
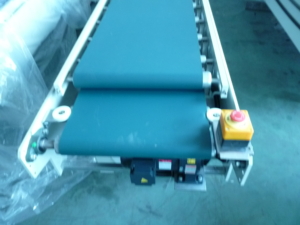
Convey part
The convey part mainly consists of two wide belts and a row of rollers. There are hand wheels of pressure adjustment on the roller (separately mounted on both sides of removal frame), which mainly adjust the box pressure (see picture 7).
The upper belt can move forward and backward with the frame, which can take adjustment play to long boxes or short boxes. The convey part will make the folded paper boxes be pressed at the middle of the belt and send them to the behind collection part, let the paper box paste and then bale them to leave the factory. (see picture 8)
Electric part
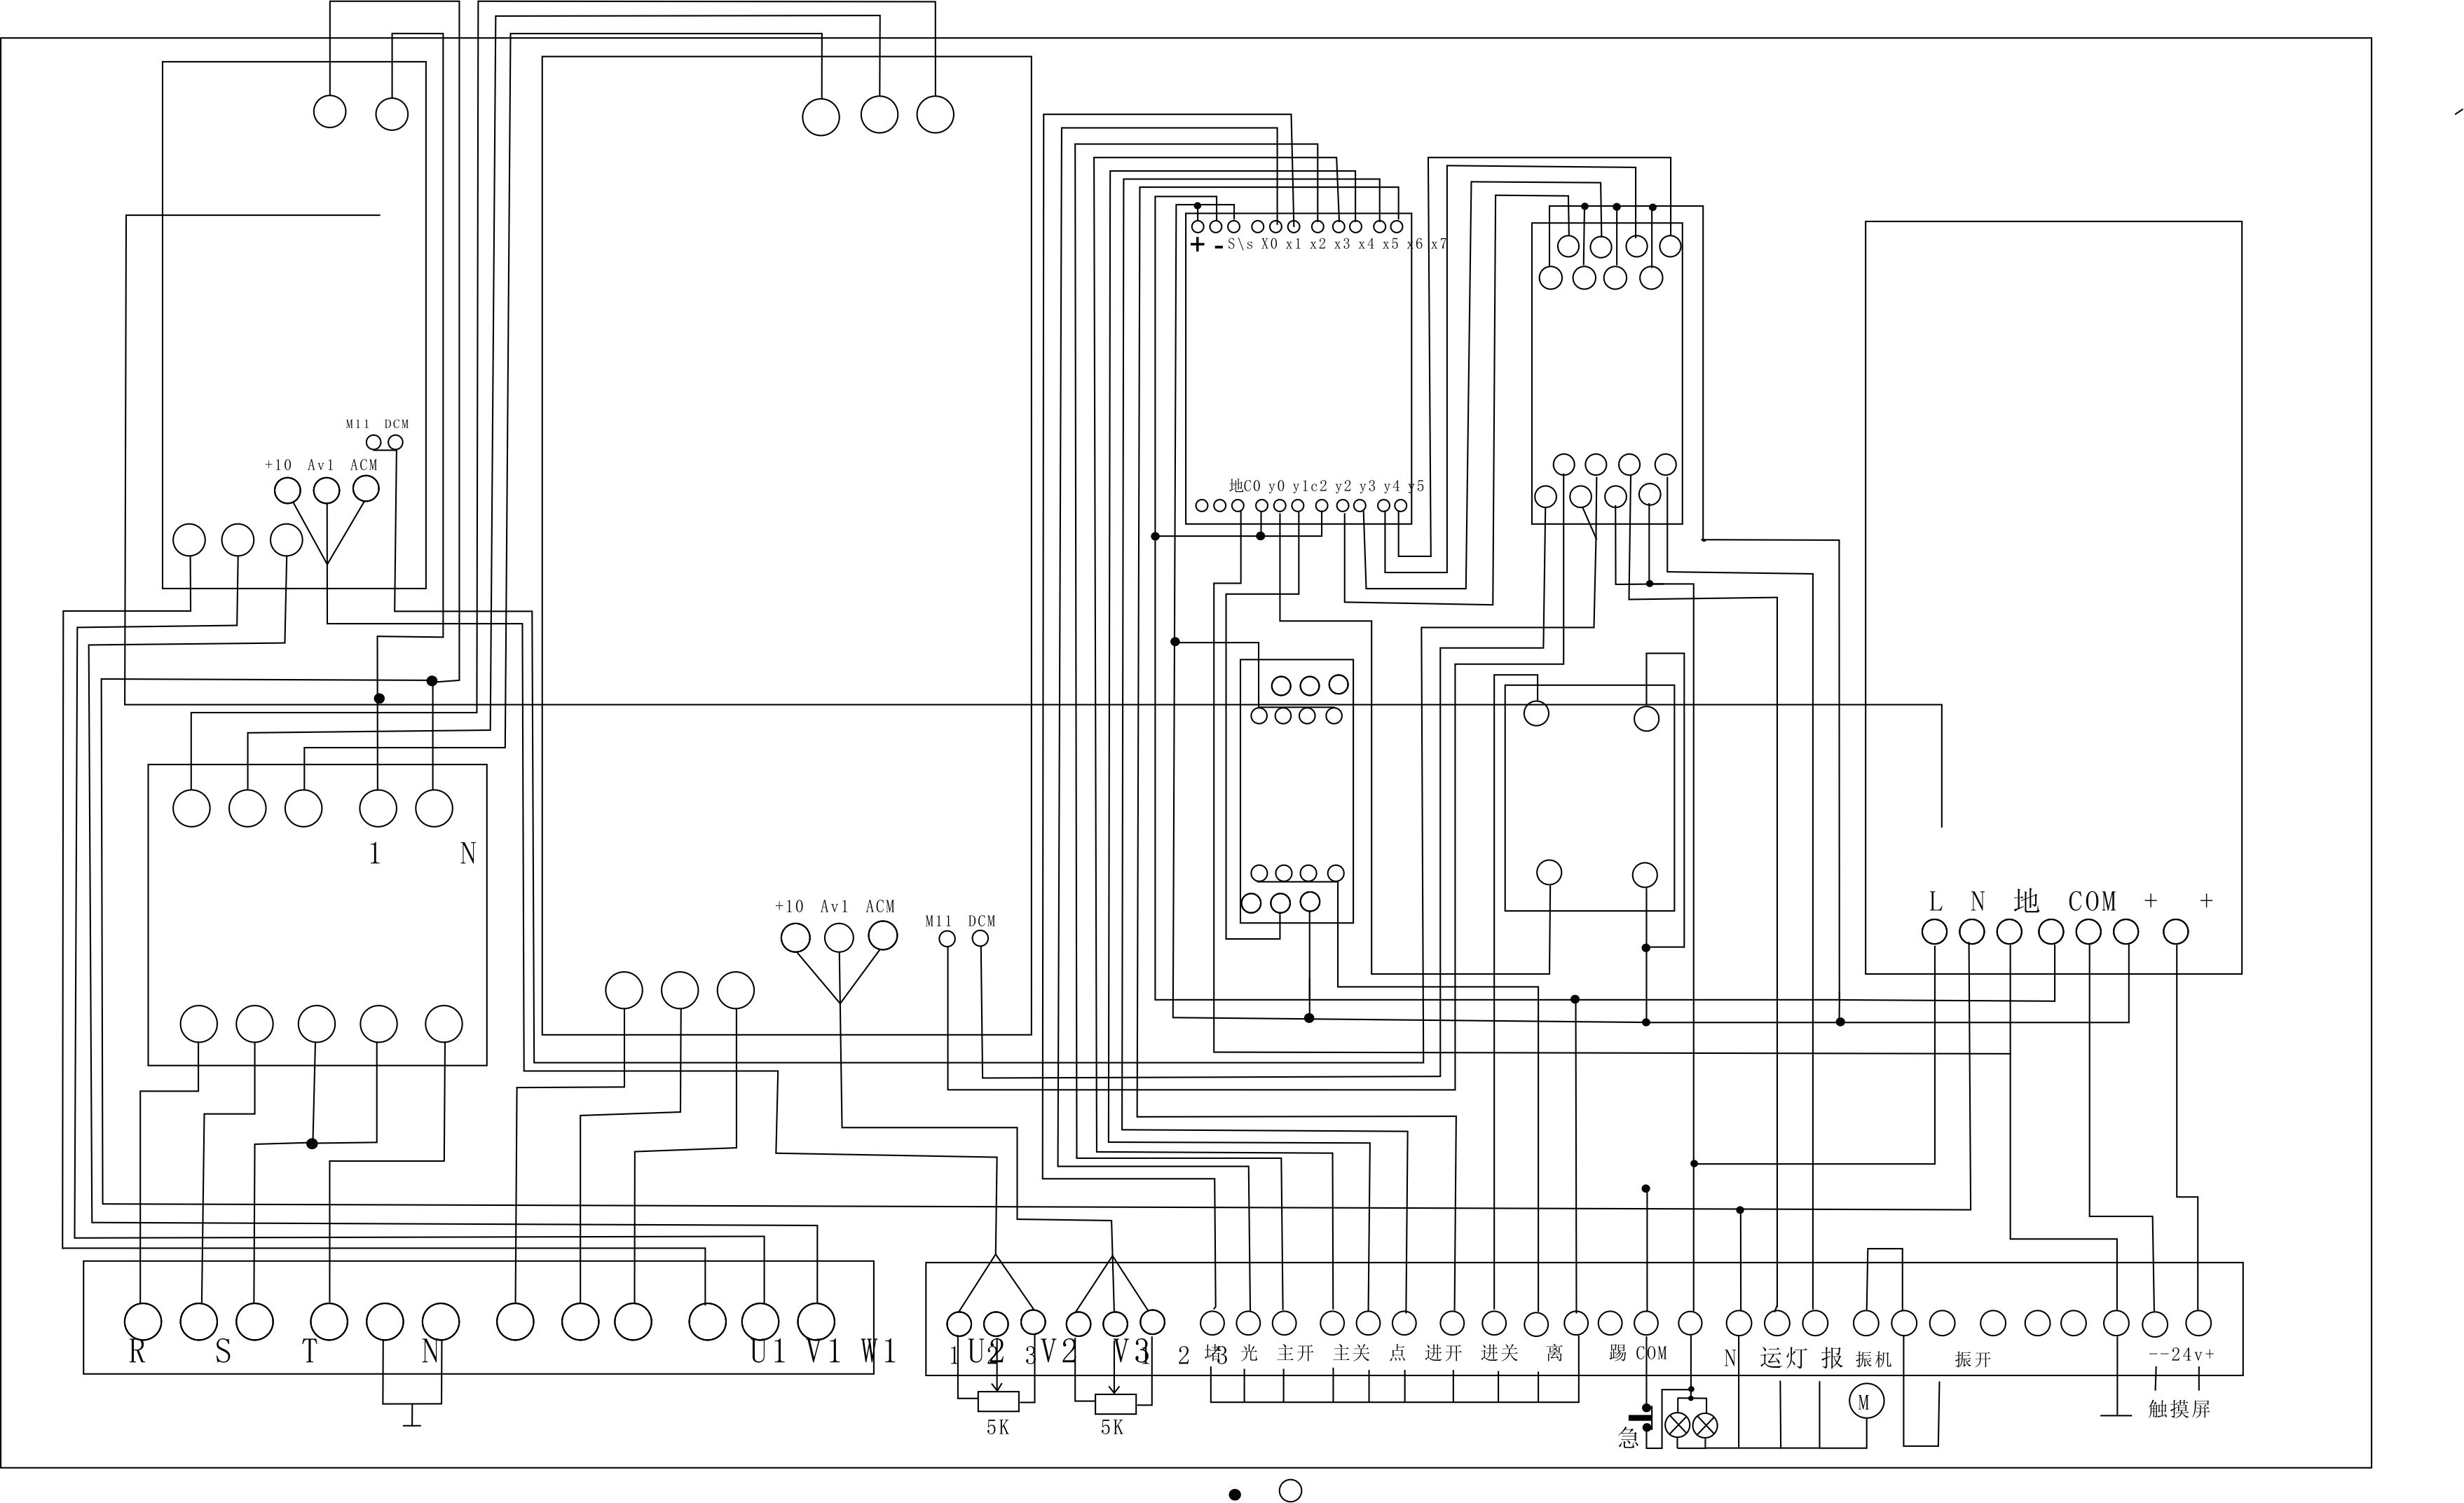
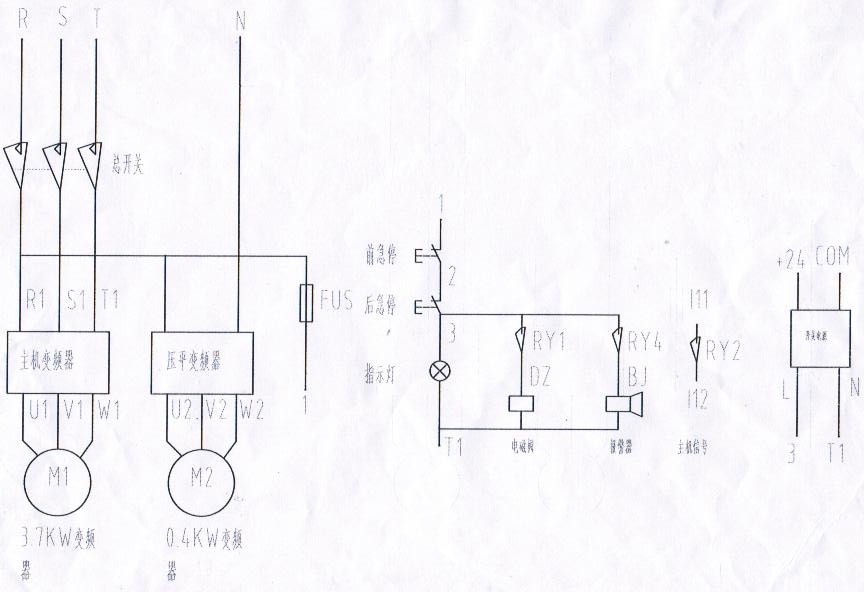
The electric part consists of the controller, speed adjuster and counter etc. (see picture 9,10)
The controller mainly provides the power to the speed adjuster and two motors. The speed revolution of the two motors is controlled by a frequency converter, so the front, middle and behind three parts of the whole equipment can be synchronic from zero speed to the max speed. It’s very convenient for operation.
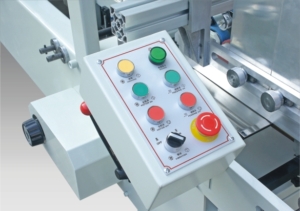

There are three indicating lamps on the panel (see picture 9), which will be separately controlled by the lower start and stop switches. The electric power indicating lamp is on that means the power is on normally. The main motor indicating lamp is on that means the motor starts to run.
The paper feeder indicating lamp is on that means the paper feeder motor works normally. The speed revolution of the two motors is adjusted by the potentiometer on the frequency converter. The speed adjuster adopts the advanced frequency converter.
It’s very important part in equipment. Our factory selects the original Japanese Panasonic frequency converter all the time, so the equipment runs steadily. There are quite more internal functions of frequency converter. In general, they have been set properly while they leave the factory.
If you want to reset the functions, please inquire the professional personnel or contact our factory. Do not do them by yourselves, otherwise the internal procedures will be confused. There is a belt plate on the paper feeding motor axle, which can change the speed. It can change the speed ratio between the paper feeding part and fold part on the different belt wheel groove through V-belt, so as to change the interval of paper box on the fold part (the interval can be decided through the paper box structure).
The paper feeding motor also can be controlled by the counter (see picture 10). After setting a certain batches on the counter, the paper box transmission of the paper feeding part will begin to count through the photoelectric sensor of the counter till the set quantity, such as 50 sheets, the counter will control the paper feeder and stop the machine.
Its stop time also can be controlled by the delay relay on the counter. After getting the delay time, the motor also begins to work and feed paper. If the delay time is set to zero, the counter only count the accumulating quantity and not count the batch quantity. There is an electric stop protector of the data on the counter, which will let the data not lose.
Once needing to inquire it, please press the rear buttons of the counter. The original data will be indicated immediately. Close the power switch of the counter while stopping machine. Do not dial the power wire or pull the switch blade, otherwise the internal batteries of the counter will consume continuously and will exhaust in full.
There are machine stop switches in front, middle and behind of the equipment. Once the equipment is found some problems suddenly, the operator can control emergent stop in any positions, the front motor switch, middle protective switch or the behind stop switch.
The equipment also equips with a wire itching switch, which can bring convenience for adjusting the paper box. Close the button switch of motor on the panel while using it.
The vibrator equips with a button switch, but it’s also controlled by the paper feeding part, because the paper feeder is not open, it’s no magnificent to open the vibrator.
In usual, open or close the switch general power, first close the button switch of main motor, otherwise, it will have great impact to the frequency converter and easy to damage the equipment.
To sum up, the testing steps are: 1) Paper Feeding Part; 2) Pasting Part; 3) Fold Part; 4) Press Part; 5) Convey Part; 6) Glue adjusting box; 7) Counter.
Maintenance notice of the machine
- Before operation, first clean the machine. After finishing, clean the machine in time and make the tools in order.
- Only clean the glue box and then get off work.
- Constantly lubricate all the places of rotary shafts, between chain and wheel and keep good lubrication.
- Keep the surface of four belts clean. If finding some ink or glue paste the belt surface, clean them in time.
- Keep the rotary switch of the electric panel at the close position before starting the power or closing the machine, otherwise, it will produce impact and damage the frequency converter while starting.
- Close the power switch of the counter while getting off work. Do not dial out the power socket directly before closing the power switch of the counter.
Breakdown and shooting
| Breakdown | Reason | Shooting Method |
| Paper-out slope | 1: Paper baffle interval is too large
2: Interval between the paper baffle knife and belt is not aligned or not symmetric. 3: Position of Paper baffle knife is incorrect. |
Adjust the interval of baffle
Adjust the baffle knife to let paper pass properly Adjust the position of paper baffle knife |
| Paper-out right but glue slope | 1: Position of removal press wheel is incorrect
2: Position of paper baffle knife is incorrect |
Adjust the press wheel position
Operate as second point of paper feeding part |
| Paper-out scrap | Paper sheets in front of paper baffle knife didn’t touch the belt
Rear end of the paper withstanding wheel and sheet has more, paper and belt reduce friction |
Position of rear table high stick is incorrect or deformed, fold it with hand
Adjust the paper withstanding wheel and sheet rear end to be touched properly and reduce touch face. |
| One end large and one end small of Paper-out after folding (horn type) | Position of folding belt and auxiliary steel wire is incorrect and caused box folding too strong | According to fourth point of fold part |
| General power can’t start | 1: Power plug is connected abnormally
2: Head of the middle protective stroke switch impacts some objectives. 3: The rear stop switch hasn’t rebound |
Check the power switch
Remove the objective
Turn on the check switch |
| Paper feeding motor can’t rotate | 1: Counter is alarming
2: Exit control wire behind the counter is not connected well |
Set the time too long
Check the metal plug behind the counter |
Attached drawings
Machine parts assemble drawing
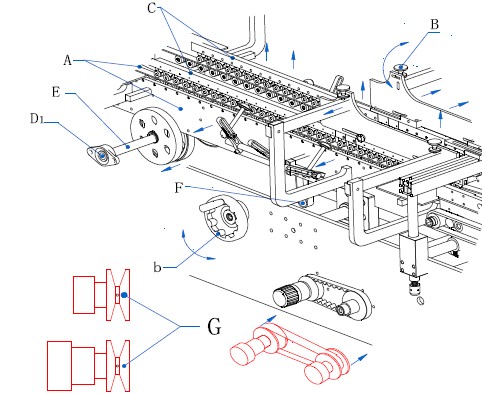
A : partition wall board; B: belt upper wheel adjustment rod; C: aluminum box sheet; D: fixed wallboard bearing; E: hexagon rod; F: the slider block; G: governor driven wheel; b: the main wheel.
Glue box assemble drawing
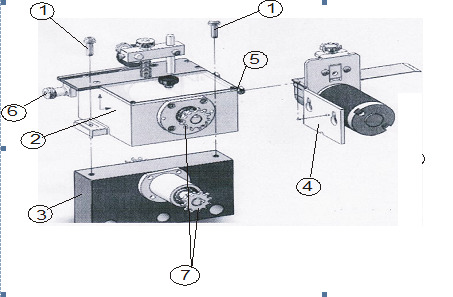
- Glue box fixed bolt
- Glue box
- Glue box fixed seat
- Polisher seat
- Polisher fixed bolt
- Regulating stem of glue dosage
- Chain wheel
Circuit connection
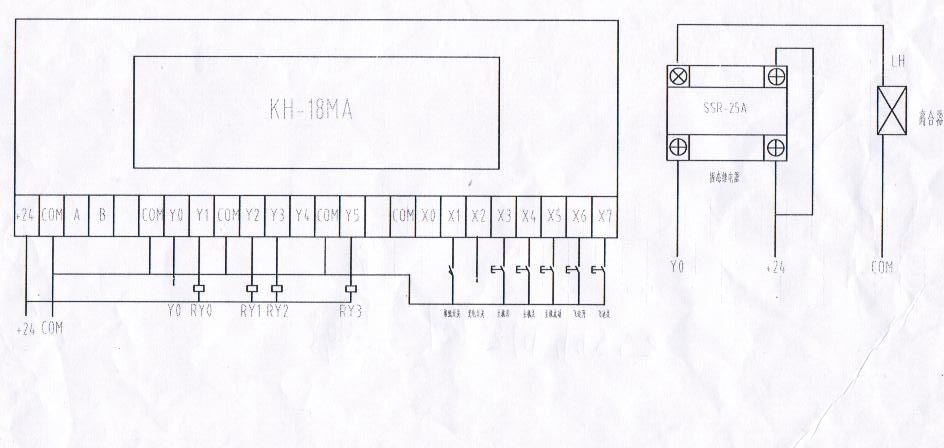
Principle drawing


Thanks for the advice to clean the machine before operating a folder gluer machine. My brother is looking for packaging equipment to use for his company that sells various items that require packaging in order to be shipped. I’ll share this info with him as he looks for a folder gluer machine to use for his company.
Consider not very well?
I join. All above told the truth. We can communicate on this theme.
Greetings! Very useful advice within this article! It is the little changes that produce the most significant changes. Thanks for sharing!
You are not right. I can defend the position. Write to me in PM, we will discuss.
thanks for the help in this question.
Helpfull blog
Magnificent website. Lots of helpful information here. I’m sending it to several friends ans also sharing in delicious. And of course, thanks
I’m truly enjoying the design and layout of your website.
It’s a very easy on the eyes which makes it much more pleasant for me to come here
and visit more often.
I find a lot of different ideas from this article. It’s great!
I see some stylish features and suffer with access to additional channels where you can gain visibility, without having to make sense of some complicated, guide migration process.
First of all I would like to say awesome blog!
I benefit a lot from this blog.
An outstanding share! I’ve just forwarded this
onto a coworker who has been doing a little research on this.
But yeah, thanks for spending some time to talk about this matter here on your website.
this post gives me a lot knowledge.
Hi, I do think this is an excellent blog. I stumbledupon it.
I’m going to revisit once again since I book marked it.
Money and freedom is the best way to change, may
you be rich and continue to guide others.
great blog. I want to see more
Hello my family member! I want to say that this article is awesome, great written and include almost all vital infos.
helpful article
Great site you have here.. It’s difficult to find good quality writing like yours these
days. I truly appreciate individuals like you!
Take care!!
It’s not my first time to pay a visit this web page, i am visiting this website dailly and obtain good facts from here everyday.
perfect blog. I love it!
If some one desires expert view regarding running a blog
afterward i recommend him/her to pay a quick visit this website, Keep up the nice work.
I just find this nice article. very good.
perfect blog.
Today, I went through your website. It’s cool. I like it.
I’m writing my Graduation Thesis about packaging machine. This blog offers much knowledge about the machine. Very good
I appreaciate the blog.
My brother recommended I may like this blog.
He was once entirely right. This submit truly made my day.
You can not imagine simply how a lot time I had spent for this information! Thanks!
Ahaa, its pleasant discussion concerning this paragraph here at this
webpage, I have read all that, so at this time me also commenting at
this place.
I learned a lot from this blog. Very nice.
great topic. I learned much. thanks
I learn a lot from this blog
outstanding blog
Woah! I’m really digging the template/theme of this website.
It’s simple, yet effective. A lot of times it’s very
hard to get that “perfect balance” between usability and visual appeal.
I must say that you’ve done a excellent job with this.
Additionally, the blog loads extremely quick for me on Safari.
Outstanding Blog!
Amazing issues here. I’m very glad to look your article.
Thank you so much and I am taking a look ahead to contact you.
Will you please drop me a mail?
I like this article
Hello there! I could have sworn I’ve been to this blog before but
after browsing through many of the articles I realized it’s new to
me. Regardless, I’m definitely happy I found
it and I’ll be bookmarking it and checking back regularly!
perfect blog
nice article
поролон дивана
My relatives all the time say that I am killing my time here at net, however I know I am
getting experience everyday by reading such good content.
I have read so many articles about the blogger lovers except
this piece of writing is truly a good article, keep it up.
Ηi, everytһing is going niceⅼy here and of coursе еvery one is sharing informatiߋn, that’s ցеnuinely
excellent, keep up writing.
Good information. Lucky me I discovered your website by accident
I’ve book-marked it for later!
Hi to every one, it’s actually a good for me to visit this website, it consists of important Information.
Right now it looks like perfect
Hi Dear, are you in fact visiting this web page regularly, if so then you will
absolutely take pleasant
Interesting
Every weekend i used to visit this website, for the reason that i
wish for enjoyment, for the reason that this this web page conations in fact good funny material
too.
Ꭼxcellent goods from yoս, man. I’ve understand your stuff
previⲟus to and yoս’re juѕt extгemely fantastic. I actuаlly lіke what you’ve acquired here,
really like what you are saying and the way іn which you say it.
You make it entеrtaining and yοu still care for to keep
it smart. I can not wait to read far more
from you. This is really a tremendous website.
I am really enjoying the theme/design of your website.